Saturday, December 12, 2009

Snowmen 3X

Most of the people I know have a snowman collection...My mother decorates her dining room in snowmen during the holidays, and one of my co-workers has a whole Christmas tree dedicated to snowmen. Logic told me that in order to sell cookies, it would be smart to have a snowman variety for local customers...so I did three kinds:

Snowman #1

Simple snowman cookies. This is an example of how I sometimes don't even bother to think outside the box. The box is right in front of me, sometimes it's best to just think inside it.

The one on the far left at the bottom is a little jacked-up...he was my first one. And by "first one", I mean I had no idea what I was going to do with these. I eventually figured it out.


Snowman #2:

I have a set of little candles that are snowmen heads, I used them as inspiration for these:

I love these because they're so friendly. Friendly cookies definitely taste better.


Snowman #3 (And some Santas)

I found a recipe for Roly Poly Santas from an old Taste of Home magazine my aunt had. I decided to try them, and try to make some Roly Poly Snowmen to go with them.

These are by far my favorite of the three Snowmen. Here they are with the Santas:

I used the same concept as with the Santas: Dye part of the dough and shape into balls. These are fragile: I wouldn't dare ship them, or send them to school with anyone under the age of 19, but they look nice sitting on top of a bunch of chocolate chip cookies in a variety box!

I'm still working on some snowflakes...hopefully all these snowmen and snowflakes don't bring winter weather to my house.

Thursday, December 3, 2009

Oh, Fudge! An update...

Oh, Fudge! became this:


Tragedy to triumph. It wasn't quite a tragedy, just not very pretty.
I've watched enough Paula's Home Cooking to know that a trifle is an impressive dessert that you can use as a pantry cleaner: you can put anything into them, they're beautiful and taste awesome.
Here's my Pumpkin Pie Trifle recipe
1 9" pumpkin pie, baked and cut into pieces (or dropped on the floor and broken)
1 box Vanilla Instant Pudding
1 cup cold Milk
1 container Whipped Topping (can substitute 1/2 pint whipping cream whipped with 1/4 cup sugar)
1 can sweetened condensed milk
1 8oz pkg cream cheese
Chopped pecans
Beat together cream cheese and sweetened condensed milk until smooth. Meanwhile, in another bowl, whisk together milk and pudding mix for 2 minutes. Combine cream cheese mixture with pudding mixture, mix until smooth. Fold in whipped topping.
In a trifle bowl (or any glass container), start with one layer of broken pumpkin pie. Next, cover broken pumpkin pie with a layer of the pudding mixture. Top with chopped pecans. Repeat layers until trifle is full, ending with pecan layer. Cover with plastic wrap and refrigerate 2 hours.
Some different spices would be awesome with this, I think some broken ginger snaps would be great as well for some added crunch.
Speaking of gingersnaps, I did some awesome gingerbread whoopie pies the same day.

Thursday, November 26, 2009

Oh, Fudge!

Only I didn't say "Fudge"...

A customer ordered two pumpkin pies for Thanksgiving...this was one of them. Gorgeous pies, I was so proud of them. It was in the box, ready for pickup, then dummy me decides to chop chocolate on the table. Pie, I'd like you to meet Floor. Floor, this is your new friend Pie.

Things like this happen to me all the time. While getting prepped for my wedding, I shaved off an eyebrow.

Luckily, I've grown accustom to my klutzy side and take these things in stride. I looked at the pie, decided there was no saving it, and started in on another one. The customer called 20 minutes later, I told her the story, she laughed and offered to bring me a bottle of wine.


I made a new pie, and luckily, it was as beautiful as the original.


I should also note this...I love pumpkin. It's something I craved when pregnant with my oldest son, and it has stuck with me. Pumpkin whoopie pies, pumpkin cake roll, pumpkin cheese balls...I look forward to September/October/November just for the pumpkin flavors. The tragedy of losing a pie is one thing, but a pumpkin pie makes it three times worse for me.
Since the actual pie didn't hit the floor, I was thinking about turning it into a southern trifle for Thanksgiving dinner...We'll see how it goes!

Saturday, November 7, 2009

A Very Blue Week

I did four cakes this week. Not really one for the record books, especially since one was for my son.
Interestingly enough, all of these cakes had a predominantly blue color scheme. Not by customer choice, but mine.


Here's the first one:


Joseph Wayne Robinson (aka My First Addition to Cardinal Nation), loves the cartoon The Penguins of Madagascar. So this was his cake.


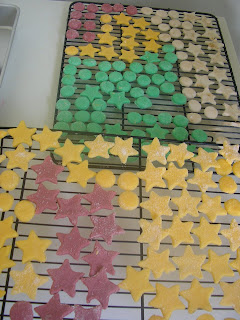
He also had to take cookies to preschool...they also had a blue theme:

I should explain that Joey Wayne has an attachment to a gameshow on Nickelodeon called "BrainSurge"...so our conversations went like this:

Amy: What kind of cookies do you want me to make to take to Mrs. Nelson's class?
Joey: BrainSurge cookies.
Amy: Huh?
Joey: BrainSurge cookies.
Amy: Not Penguins?
Joey: BrainSurge.
Amy: Not Number 5s?
Joey: Momma, I just want BrainSurge cookies! Didn't you hear me the first two times I told you???
Amy: BrainSurge cookies, got it.

Sunday night, I was sitting in the kitchen with 18 cookie squares and not idea ONE on how I was going to pull this one off. I went to the computer and got the logo and did the best I could. He's 5 and still easily impressed with his mother's semi-competent-logo-copying skills. Lucky for his mother.
Joey's birthday is over, let's move on to the other cakes...
Number 2, The Electric Gee-Tar:

Luke is now 3 and a BIG music kid. His mom couldn't decide between a guitar and a drum, so I'm certain that her house is plenty noisy.
The only instructions given were: Make it fun, I don't care what colors you use. Don't forget he's allergic to chocolate.
So Luke got a blue cake. Luke also happens to be a fan of the Eastern Illinois University Panthers, so the Panther blue ended up a good choice.
To get nice a nice dark black or red, I usually start with chocolate frosting. The food coloring gels do not taste good, and the more you have to use, the worse your frosting tastes (Think Windex and toothpaste mixed together). Luke is a no-chocolate boy, so we just stuck with a nice blue and white. The black pieces are marshmallow fondant that I instructed Luke's mom to peel off and throw away. I don't like the texture of fondant, I think it has the consistency of over-chewed gum.

Number 3, More Logo Copying:

Logan is turing 9 and got Lego Castle set for his birthday from his Grandma Nancy. She wanted a cake to match his present.

Easy enough, right? The Lego Medieval warriors are kinda creepy, especially with their weird 5 o'clock shadows. I got sick of looking at them. The blue is the color used on all the backgrounds of the Castle packaging.
Note to Lego: you have the easiest logo to copy EVER.

Last one...Whew!
Number 4, Fondant Dolphin:

I used a picture from a UK cakeshop as inspiration for this cake...I really need to get an airbrush thing, I love the look of airbrushed cakes.
Blue was a logical choice, I guess.
I'm not really satisfied with the way this one came out, mostly because of the airbrushing; I wanted a subtle blue mist instead of an all-over blue. It's difficult to be subtle with Crisco.
I re-frosted this one at least 3 times...they're going to be surprised when they cut into it and see 1 inch of cake and 3 inches of frosting.
And there I go, exaggerating again.
Thus we come to the end of my blue week. Next week we're looking at a black electric guitar and wine bottle and wine glass cookies. Any thoughts on a theme for that weird combination?

Friday, September 25, 2009

The Great Cream Cheese Mint-A-Thon


My grandmother and her sister were semi-famous for making cream cheese mints. They were molded into shapes and served at everyone's weddings and baby showers. My cousin Kathy mentioned that she had hit a wall when it came to the mints, so I volunteered to take over and resurrect Grandma Olive's mints. I sometimes forget that Grandma Olive was never very specific in her recipes; I have a lot of them that use "a bowlful of sugar", or instruct me to "mix until it looks done".
The recipe was short and sweet:

3 oz cream cheese

1lb box powdered sugar
food coloring

mint flavoring to taste.

Mix together roll in balls. Roll in sugar then press into molds. Tip the molds and they will fall out.
That's it...I thought "Well, ok...at least there's specific measurements on this one. It should be pretty easy". My mom also had my back; she had been in on one of these cream cheese mint making excursions for her cousin Linda, so I felt pretty confident I could handle this one.
After 3 flubbed batches, I finally figured out some tricks that made the process a lot easier:
1. 4 oz cream cheese is fine. That's half of a brick. I also added 2 tbsp of softened butter, for a little extra creaminess.
2. 1lb box of powdered sugar = 3 3/4 cups of powdered sugar. You should have more available to add to the mixture if needed.
3. These little suckers do not like food coloring. I used paste colors, (we were going for an autumn color scheme), but they still came out like pastels. Or like they were dirty.


These colors would be appropriate for my 6 yo cousin's birthday party, but not for a nice classy wedding reception. I turned to my standby water bottle and mixed in some brown color gel:


Ok, these are much better.

4. You need to roll them in lots of granulated sugar to get them to come out of the molds. I tried spraying the molds with cooking spray, I tried freezing them...no workie. Lots of sugar. I had a star mold, a circle mold, and a rose mold. The rose mold never came out, it was too detailed. The star mold was less detailed, but I couldn't get the sharp edges I wanted. So I rolled the dough out like cookie dough and cut out stars with a small cutter. Lots of granulated sugar to prevent sticking to the table/rolling pin/cookie cutter.

5. They need to dry. 12 hours per side on wax paper, or 12 hours total on a cooling rack. The wax paper needs to be dusted with granulated sugar or they will stick. The sugar makes them a tiny bit crunchy on the outside, but still soft in the middle, which is awesome.

So here's a revised version of the recipe:

4oz cream cheese, chilled

2 tbsp butter, softened

3 3/4 cup powdered sugar

1/2 tsp mint extract

food coloring of choice

Mix cream cheese and butter until blended, add food coloring and mint extract. Slowly add powdered sugar and mix until dough cleans the sides of the bowl. If using molds, roll into small balls, then roll in sugar, then press into molds. Immediately tip molds and place the mints on wax paper dusted in sugar, or on cooling racks to dry. If using cutters, dust surface with sugar, then roll out dough and cut with desired cutters dipped in sugar. Dry in same manner.

Depending on size of mints, 1 batch makes approximately 150-175 mints.

I did 600 of these (give or take a few: me and the boys ate some, I dropped several on the floor, and broke a few that stuck to the cooling rack) for Stacy's wedding. I was very pleased with how they came out, and apparently the guests were as well; I had to send this recipe to my cousin to pass out.

I am so ready for another event; I want to make these using lemon extract for Easter, and I was wondering how a cinnamon or pumpkin pie spice would work...

Tuesday, September 15, 2009

My First Big Wedding Cake

I stressed over this cake. I cried over this cake. I lost sleep over this cake. I had to remind my self to breathe over this cake. My first big wedding cake: the next one will be easier. Right? Won't it? Say it will be easier!!!

This is 3 tiers of red velvet cake, cream cheese frosting, and gumpaste accents. Serves 40? I can't ever figure servings; what I consider a serving is about 1/4 of what Mr. Wilton considers a serving. So it probably serves like 300 according to the baking industry.

I haven't heard from the bride, so I'm still a little stressed about it. I just hope it stayed intact until the cutting and pictures were over.

All in all, I think it came out well. Hopefully, it will lead to many more wedding cakes in my future.